Pages

Showing posts with label paint. Show all posts

Sunday, May 15, 2011

When Paint Goes Wrong

...terribly wrong. I'm talking attack you like a glowing Smurf wrong. It was supposed to be lucky #17. Yep, that's right, I tested 17 different colors on the wall. And #17? Had me swooning. I had already decided I wanted a brownish tan on the bottom, and loved Glidden's Olivewood. And I thought #17 was the perfect, airy blue to go with it. I mean it was called, after all, Mount Airy.


Boy, was I wrong.

J took Wednesday off to paint the baby room while I was at work. He called a little after lunch to say the brown looked awesome, but he wasn't sure about the blue. I told him to stop and wait until I got home and looked at it. Then he sent me a picture and said it was drying fine -- and from the picture, it did look fine. So he kept going.

And when I got home at 5? I was greeted with a nervous husband. I asked him what's wrong. "It's glowing," he said. I didn't have to go far upstairs before I could see what he meant. It was literally glowing, like a house for Smurfs. Or Thomas the Train. And I burst out laughing. Laughing. Not exactly the reaction J was hoping for. I felt bad, considering he'd spent his whole day off painting, but it was better than crying, right?

We went back and forth on what to do. I hated the idea of him repainting, but not sure I could live with it. J wasn't in the mood to repaint, but frustrated he didn't just stop. What was amazing was that the color was perfect with the light on. Gorgeous.


But with the light off? There aren't words. And pictures hardly capture the "glow"...


How could one paint look so different?! I guess it wouldn't have been that bad if we hadn't done the ceiling, too. And, the darker it got outside, the darker the room became, even with the light on. I told J I'd do whatever he wanted, and I think he knew I really wanted to do it over. So, we grabbed some dinner and headed to Lowe's to pick out new paint.

We each grabbed sample chips we liked -- me grabbing blues, J grabbing greens (at this point he decided that maybe I didn't like blue... I started to think so myself...), and narrowed it down to two greens and two blues. We got the samples home and on the wall, and I quickly decided on Valspar's Cool Sheets, a light blue with a hint of mint. J was hesitant, but wanted to get it done that night. So, we went back to Lowe's and got the Valspar with Primer in eggshell, and it thankfully covered that blue mess.


Poor J stayed up until 2 a.m. repainting that room. I didn't get a good look at it until the next day, and I looooved it. J was even glad he repainted. And that it was all done before his fishing tournament Thursday night. {Priorities, right?}

I'm super happy with how it all turned out, despite the double money spent in paint. {Note to self: when J says use a certain brand, use a certain brand. The cheap stuff? Glows.}


Excited to finally starting pulling together all the final -- and fun! -- touches over the next few weeks. Maybe we'll actually get done before baby! ;)


Linking up to these fabulous parties:

Monday, May 2, 2011

Baby Room Progress

So, I think I've posted the "before" picture of our baby room. Just incase you missed it...


A.k.a., the junk room. So awful, it's almost embarrassing! After a garage sale, freecycling and just plain organizing, it's now this:


My parents were awesome enough to buy us the crib, and we bought the chocolate brown glider (most. comfortable. thing. ever.). Not sure what I'm doing with the white letters on the floor yet, but they were a Hobby Lobby clearance that I couldn't pass up.

And I never thought it would be hard to shop for baby boy stuff, but trying to find bedding that wasn't themed and not too girlie was exhausting. Finally found a set online at Target, and I just love the colors and patterns:


J started on the moulding for the room last night, so I'll post that once it's done. Now I just need to pick a paint color...


...the samples are starting to multiply like rabbits!


Linking up to these fabulous parties:

Tuesday, March 1, 2011

It's About Time...

We finally started on the baby room. It's a small start, but at least I got a few paint samples on the wall! :)


I think I'm liking the last two, but will wait until we get the bedding this weekend to officially pick one. Our next project will be doing board & batten on the walls. I first fell in love with it when I saw this photo at Restoration Hardware:


Since, I've seen numerous tutorials floating around blog land, so I'm hoping it won't be too hard to do. While I've bookmarked several of the tutorials I've seen, please let me know if you have one too ~ I'd love to check it out!

Friday, September 24, 2010

Wish List: Painted Ceilings

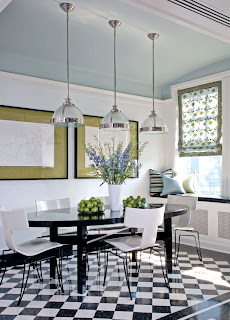
I just love painted ceilings. I think it makes a room super cozy and makes it seem more "complete". I've been thinking of painting the ceiling in our office to start. I figure I'm really the only one who's in there anyway so, if it turns out horrible, J can just shut the door and ignore it :)

Some inspirational photos I'm drooling over...


Pretty, huh?

Friday, July 2, 2010

"Home" Plates

The wall above the breakfast nook's been looking a little bare...


I kept thinking I wanted to hang plates there, just not sure what kind. Then, after seeing many of you monogram your own plates, I thought I'd do something similar. So, I found these beautiful white plates on clearance at Target.


I had paint brushes, but went to Hobby Lobby and bought some black Acrylic paint and 4" stencils.


I cut around the letters I wanted and taped them down.


J walked in while I was painting the first one, and asked if the paint would bleed underneath the stencil. Of course not silly, I replied ... then ate my words when I removed the stencil. Oops!


Guess I'll have to figure out a different way to do that. Although, after all the plates were dry, I used a small pair of sharp scissors to scrape off the paint I didn't want. Cleaned it up quite nicely, I think!


I'd also bought these plate hangers to glue to the back of each plate...


But, once I was ready to hang, I realized the backs of my plates aren't flat:


I may go ahead and try it anyway. Otherwise, I'll have to think of a Plan B. So, for now, they're resting on the kitchen island. Super simple, and super cute! :)


Linking up to these fabulous parties:


Sunday, May 30, 2010

Old-TImey Tray

Last night while J was working in the garage, I decided it was finally time to do something with the $5 wooden tray I found at Hobby Lobby last month.


Not sure quite what to do with it -- and wanting to alleviate some stress -- I decided to bring out the trusty Mod Podge and some scrapbook paper.


I originally thought I'd just Mod Podge the whole thing with paper, but then decided I wanted to paint the outside and edges and just paper the inside bottom. So, I found an old sample of Glidden paint in Olivewood, mixed it with some water, and sponged it on. {Because I'm impatient, I used a hairdryer to help it dry faster.}


I found a couple of pages in my paper book that had old-timey letters and lists written on it, and decided to use that for the bottom. I did one big piece, then layered on a few pieces that I ripped. For the smaller ripped pieces, I used Chalk Ink around the white edges to make it look like older paper.


I just love how those edges turned out!


After everything was stuck down, I did a final layer of Mod Podge across the top. I think I spent less than an hour on this project? But I think it turned out quite cute:


The bottom's not as shiny in person -- guess it's just my flash. Not quite sure where I'm going to put it yet, either on the nightstand in the guest room...


...or on the empty desk in the hall nook.


Hope everyone's having a wonderful long weekend!

Linking up to these fabulous parties:

Friday, May 21, 2010

From Bedroom to Retreat - Slowly!

After we moved in, the only things we changed in our master bedroom were the door knobs and the light fixture. So last fall, while J was out of town, I decided it was time to finally paint. I didn't think to take a true "before" picture until I'd started moving furniture --


For the paint, I color matched a sample I had and loved it. But, when I went to Lowe's at the last minute before they closed, they couldn't figure out the ratio and ended up color-matching the color match. Do you know where this is going?

Yeah, so at midnight when I started painting, I got half a wall done before bursting into tears. The color I wanted was more of a brownish-grey. The one I got? Definitely all grey and no brown. Now, though, I like it. It's actually quite calming in the mornings when the sun shines through. And it looks great with just about any color.


I just love how kitty likes to be in every picture. Anyway, the real reason for this post? I finally found a spot for my wrought iron beauty.


Yeah, I think we hung it a tad high. Oops! Because it's soo heavy, we had to use anchors ... which equals big holes ... which means it's staying put for awhile. But I do love how the swirls compliment the swirls in this pillow I found at Pier 1.


I'm hoping to find curtains and new lamps soon, maybe a new bed frame. And maybe convince J to hang some crown molding? Definitely! ;)


Linking to the fabulous parties:

Wednesday, May 12, 2010

A {Slight} Bathroom Update

Well, so I thought I'd found the perfect color {Cappuccino White, Home Depot} for my guest bathroom upstairs. J loves it -- I think it turned out kind of bland. It's hard to tell the difference between the before and after, especially in photos.

Here's the before:


Here's the after:


Ohwell, it's still better than builder white, right? We also bought a cool light fixture at Home Depot ... only to realize that we had a huge hole in the wall behind the existing light. Guess we'll either have to patch the wall or find something the same size as the existing.

And I just {heart} the windows above the bath. They were one of the first things I did when we moved in, and it was super easy -- I just applied some decorative window film and viola! Pretty privacy.


I'd like to frame out the mirror at some point, so if you have any tips & tricks (or a great tutorial!) let me know -- I have several mirrors to do!
Related Posts Plugin for WordPress, Blogger...